

Single Sign-On (SSO) has become a key solution in the web application space, offering users a seamless and efficient way to access multiple services with a single account. This article serves as a basic guide for developing an SSO server based on ASP.Net Identity and Openiddict. Whether you’re a developer looking to improve the user experience or an IT professional looking to simplify access management, join us as we uncover the ins and outs of implementing SSO and improving your web ecosystem. This guide uses Openiddict instead of Identity Server 4 because the latter’s developers have moved to a new licensing scheme and the free option is no longer supported for enterprise use.
Requirements: .NET 7
Creating a project:
First, we need to create a new ASP.NET Core Razor Pages application with the “Individual Authentication” option enabled.

After creating the project, you can run it and a new tab with such a window will open in your browser.

Adding and setting up Openiddict:

Now we need to add the Openiddict packages to your .csproj file or through the NuGet package manager.
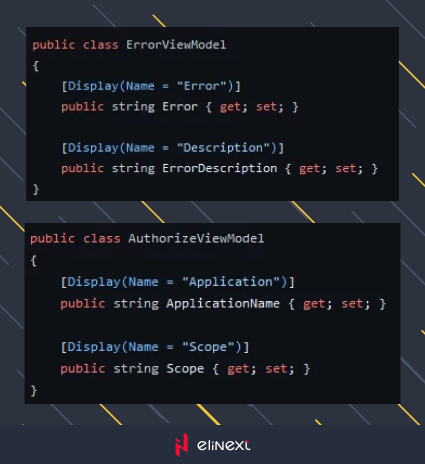
Create the following AuthorizeViewModel and ErrorViewModel in the Models folder.
We also need 2 helpers AsyncEnumerableExtensions and FormValueRequiredAttribute. Create them in a folder Helpers.


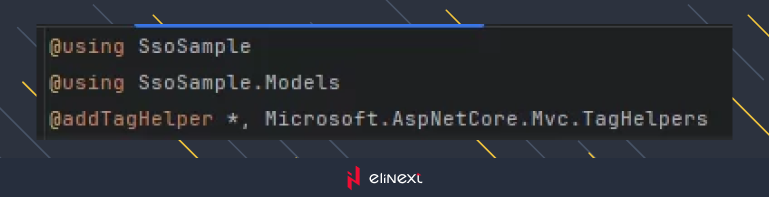
Add to Views/_ViewImports.cshtml
Add a page Logout to confirm logout Views/Authorization/Logout.cshtml.

Add page Authorize to confirm system logout
Views/Authorization/Authorize.cshtml.

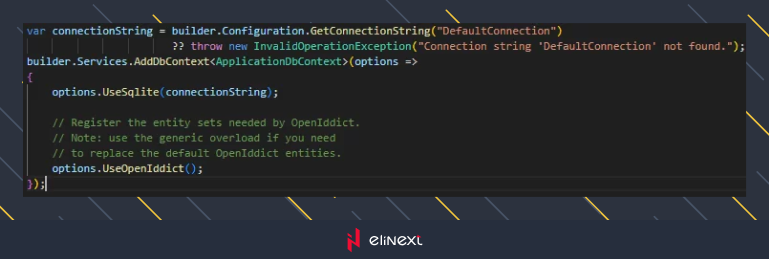
Next we need to edit the file Program.cs
Paste options.UseOpenIddict() in the context configuration.
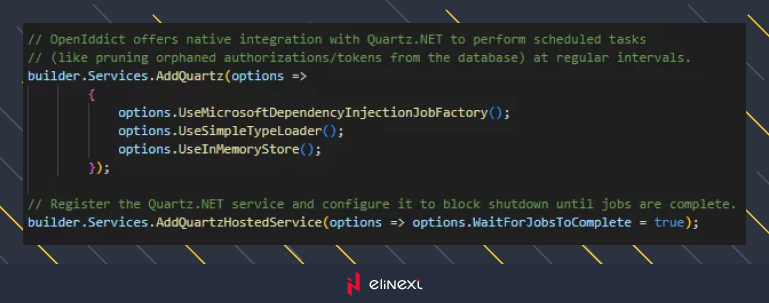
Add integration Quartz.Net into your application to perform repetitive tasks.

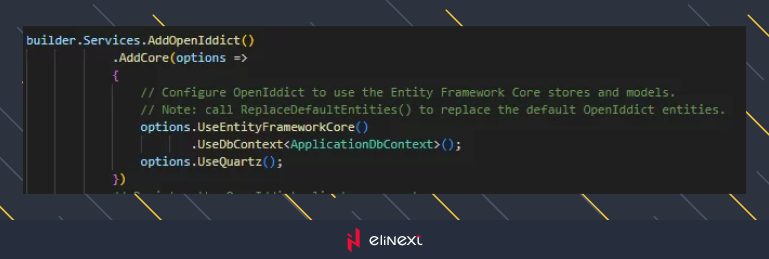
Now it’s time to set up Openiddict. You can see the description in the screenshots.
You can see a complete example of a configuration file here.
Now we need to add custom controllers, since Openiddict does not have them out of the box, unlike the Identity server. You can find ready-made implementations for this example here and here.
Creating a client:
Now we need to add primary data when the application starts. To do this, create a file Worker.cs

To initialize the data, add this line to the file Program.cs

It’s time to add the migrations and apply them to the database (by default the project uses SqLite, if you want you can easily switch to any EF Core supported database).
Example commands for adding and applying migration:
dotnet ef migrations add –project SsoSample\SsoSample.csproj –startup-project SsoSample\SsoSample.csproj –context SsoSample.Data.ApplicationDbContext –configuration Debug AddOpeniddict –output-dir Data\Migrations
dotnet ef database update –project SsoSample\SsoSample.csproj –startup-project SsoSample\SsoSample.csproj –context SsoSample.Data.ApplicationDbContext –configuration Debug 20231008224445_AddOpeniddict
Once the migrations are created, you can run the application and register your user.
To simulate a plug-in application, we will use Postman. Go into it and go to the Authorization -> Configure New Token tab, in Type select Oauth 2.0 and fill in the fields as shown in the example below.
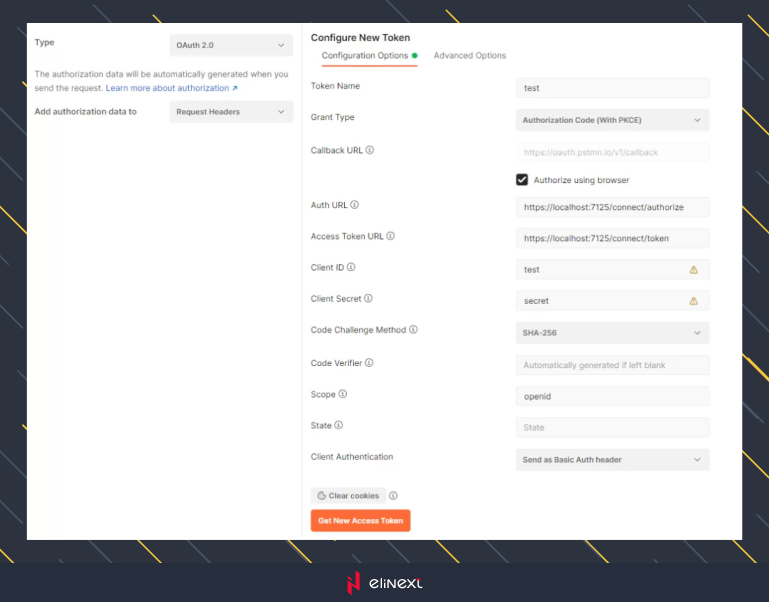
Click Get New Access Token, a browser window will open in which you will be asked to log in to your account. If you see errors at this stage, check whether you are initializing the correct data in the database. If everything went well, you will be transferred back to Postman.

Next you will be able to view the received token, which you can use to send to your secure Api.

Please note that if you copy the resulting token and paste it into jwt.io, you will receive an invalid signature error since the payload is encrypted by Openiddict. For more details, read this GitHub issue: https://github.com/openiddict/openiddict-core/issues/325

Conclusion
The implementation of single sign-on (SSO) in web applications is an integral part of modern authorization and authentication systems. This technology allows users to access multiple applications with a single set of credentials, making the login process much easier and faster.
The benefits of SSO are obvious:
- increased safety
- improved user experience
- reducing the load on administrators.
Users can log in once and automatically gain access to various applications without having to re-enter their credentials. This reduces the risk of password leaks and simplifies application access management.
In this article, we have provided a step-by-step guide on how to implement SSO in web applications. You can easily add other Grant Types (implicit, password, etc.) to this example to allow you to connect even more types of applications to your SSO.
Implementing SSO can be a challenge, but with this guide, you’ve got all the instructions you need for a successful implementation. Remember that security should be your priority, so follow best practices for setting up and securing your SSO system.
